![]() I’d had Resolve in my applications folder for forever but not for one second did I think I would ever need it, let alone learn to use it. But since I became interested in color grading, I realized FCPX wasn’t going to cut it. There remained only one obstacle – importing XML files into Resolve from Final Cut. Each and every time I tried, Resolve would crash. Of course, I consulted the Black Magic forums, but there weren’t any step-by-step procedures. Some readers suggested the problem stemmed from downloading Resolve from the Apple store, recommending instead getting it from Black Magic’s site. That wasn’t the answer, either. So I spent countless hours trying everything before figuring it out. Here is a brief tutorial for those using FCP 10.1 and OSX 10 Mavericks.
I’d had Resolve in my applications folder for forever but not for one second did I think I would ever need it, let alone learn to use it. But since I became interested in color grading, I realized FCPX wasn’t going to cut it. There remained only one obstacle – importing XML files into Resolve from Final Cut. Each and every time I tried, Resolve would crash. Of course, I consulted the Black Magic forums, but there weren’t any step-by-step procedures. Some readers suggested the problem stemmed from downloading Resolve from the Apple store, recommending instead getting it from Black Magic’s site. That wasn’t the answer, either. So I spent countless hours trying everything before figuring it out. Here is a brief tutorial for those using FCP 10.1 and OSX 10 Mavericks.

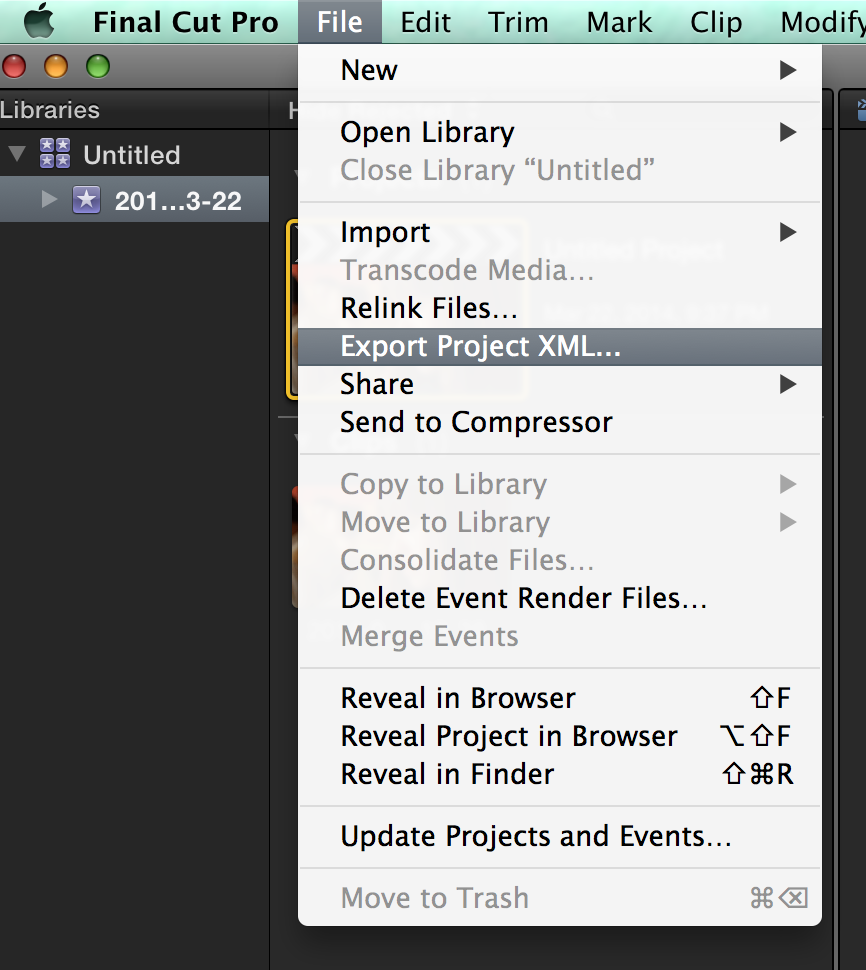
Once you’ve completed editing your project, the first step is to go to the file tab in the toolbar and select Export Project XML.
A dialogue box will open. Give your project a name and be sure to save the file to your computer, not to an external drive. Hit Save.

Quit Final Cut Pro and open Resolve. Go to the Edit screen.

Select the gear icon and configure your project. I shot my video with a Lumix GM1 at 24fps. 24fps may very well be the holy grail of filmmakers, but it sure can be confusing! No wonder some prefer shooting at 30fps for internet delivery. If these settings don’t match those of your project, Resolve won’t recognize the file.

Hit Apply, then Cancel. At this point, you can go ahead and hit the + sign on the upper left corner of your screen and create a new timeline.

Now you’ll want to give a name to the timeline.

At last, you are ready to import the XML file. Right click in Timelines in the upper left corner of your screen and select Import XML.

You will be asked to select a file to import. Black Magic advises importing XML files from a path you’ve already added to Preferences, Media Storage, but I’ve successfully imported from sources that weren’t added to my preferences.

After you have done that, another dialogue box will appear.

It’s best to leave the boxes Resolve has checked alone. If everything looks alright, hit Ok.

Your files will appear in the timeline and you’re ready to begin editing your clips.

I hope this tutorial has been useful. I welcome any comments or suggestions.

followed your instructions but it stilled crashed!!!
You’re a lifesaver! I used a variation of this trick to import a .fcpxml file to Premiere. Basically, I didn’t realize I needed to do the following (in case it helps anyone else):
1. Open Resolve, and change the project settings to be identical to the settings used in FCPX.
2. Create a new, blank timeline.
3. Change the workspace view to Edit.
4. Having the new timeline selected, go to File > Import XML.
5. Double-check that the settings match, and hit OK to begin importing.
Worked for me! Thanks so much!
It is still crashing, can you help? I have DaVinci 12, and am trying to import a XML. The moment I select ‘import’, it crashes.
Da Vinci keeps crashing for me as well! I followed all of your steps but was exporting an XML from Premiere Pro instead. I’ve done this before without any issues. Not sure what the problem is this time. Any suggestions would be really helpful!